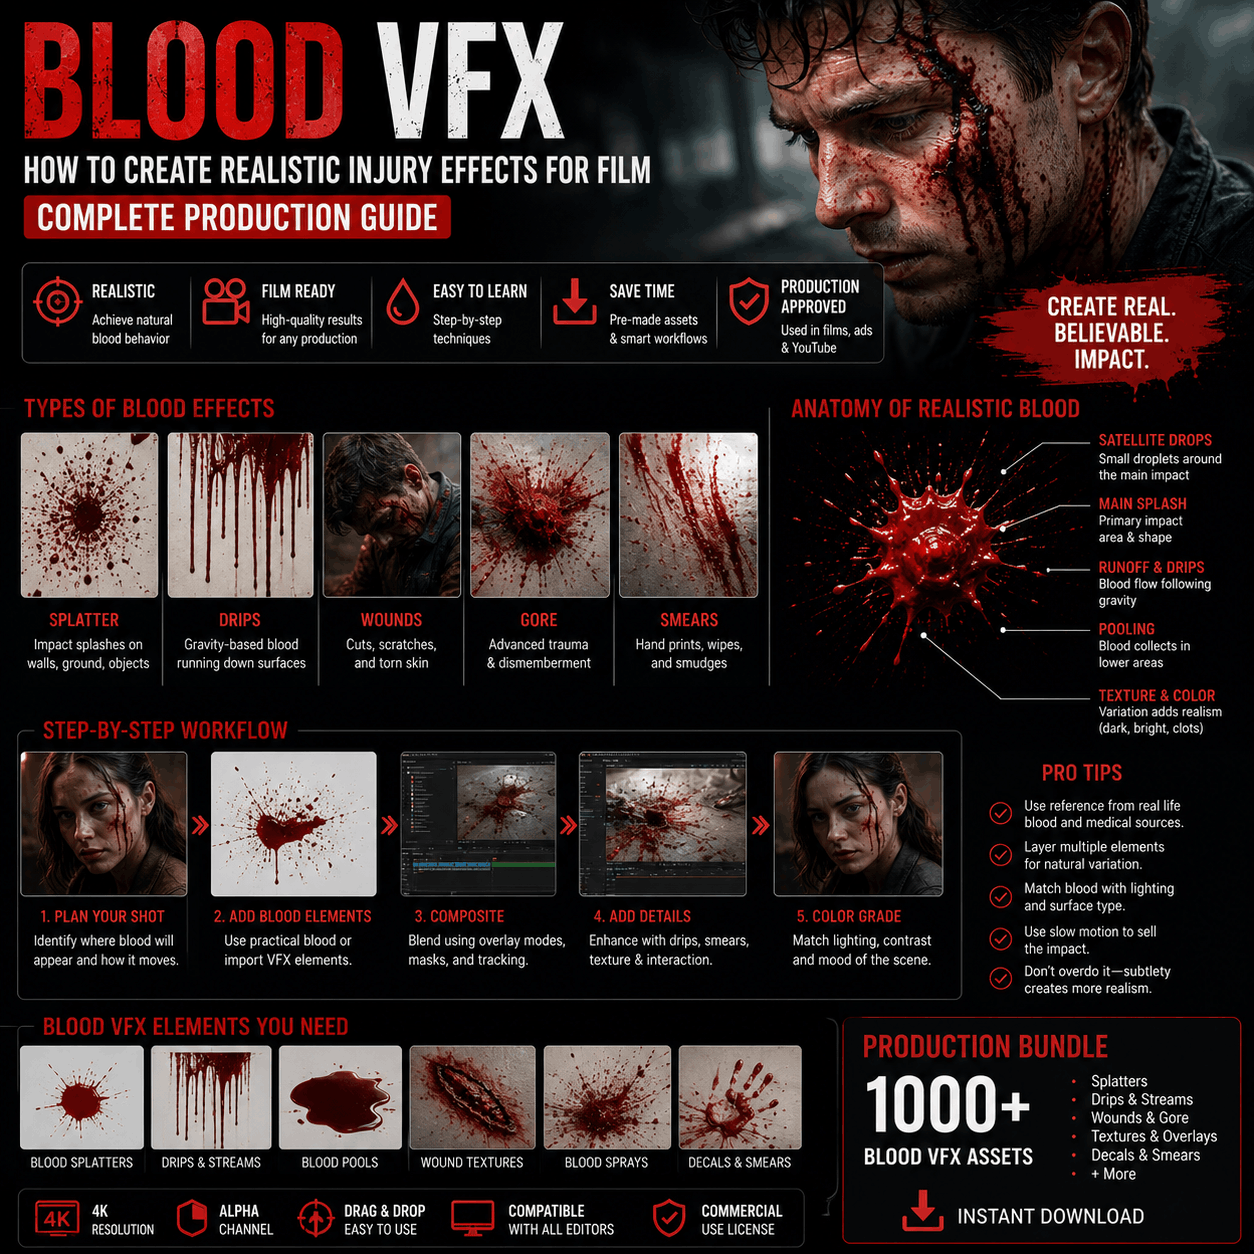
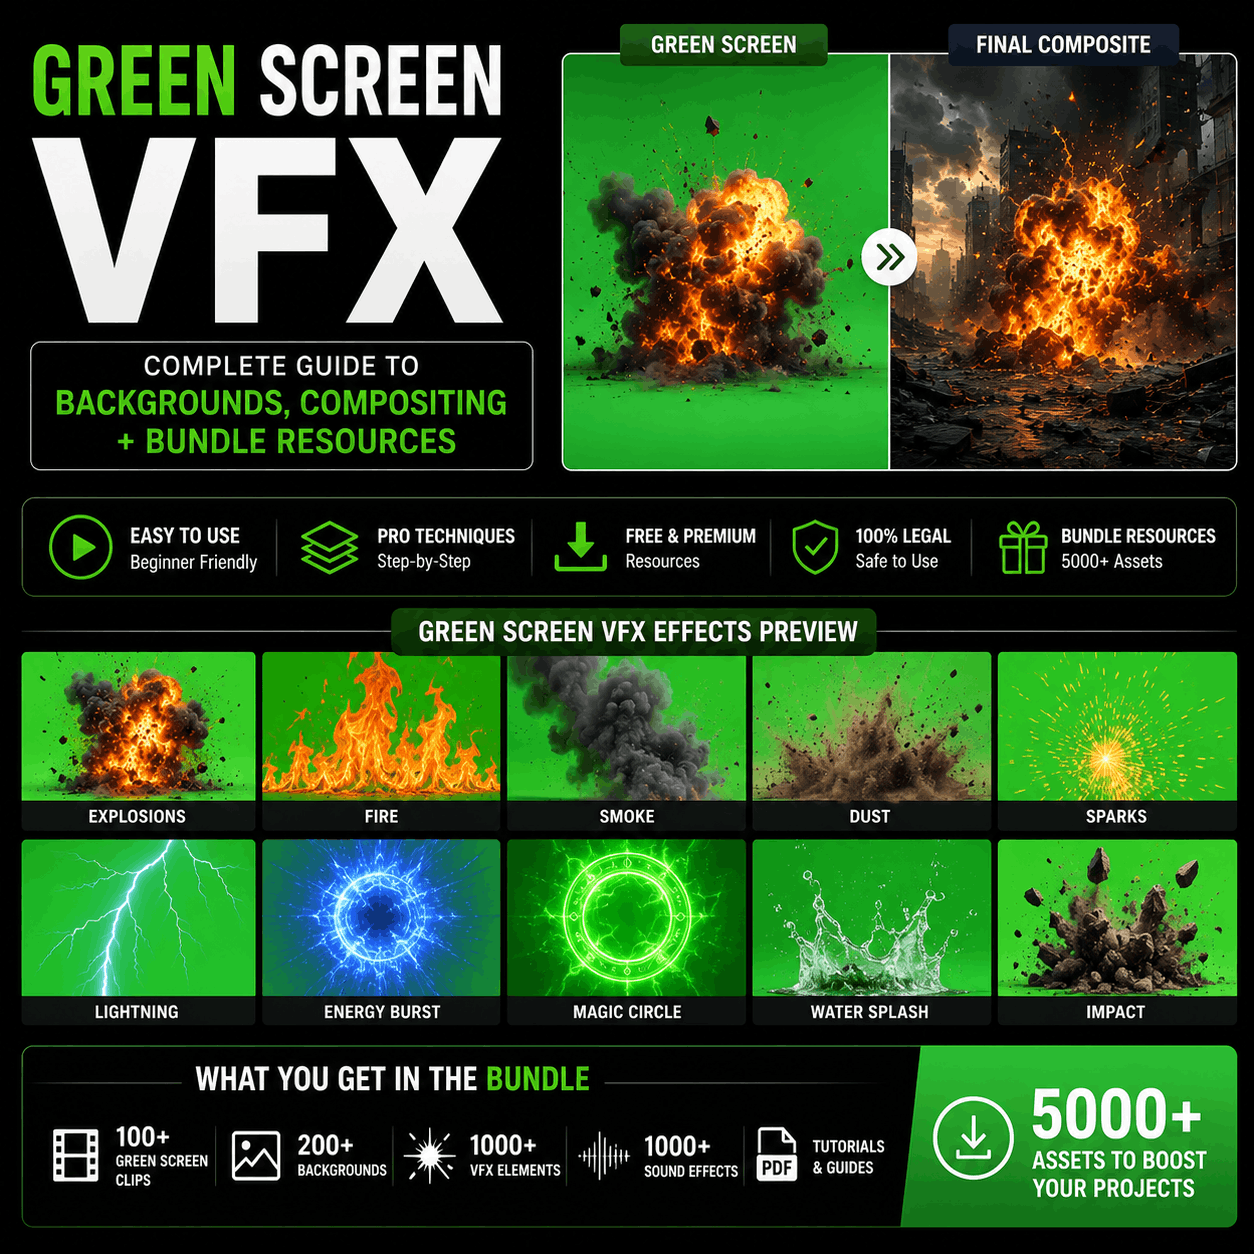
Green Screen VFX: Complete Guide to Professional Chroma Keying and Background Compositing
Introduction
Green screen is one of the most powerful visual effects tools in video production. It's also one of the most misunderstood.
Most people think green screen is just about standing in front of green fabric and having a computer "remove" it. The reality is more nuanced—and that's where professionals create magic.
This guide covers everything about green screen VFX: how it works, how to use it professionally, what VFX integrates with green screen, and how to avoid the amateur mistakes that make green screen look cheap.

What Is Green Screen VFX?
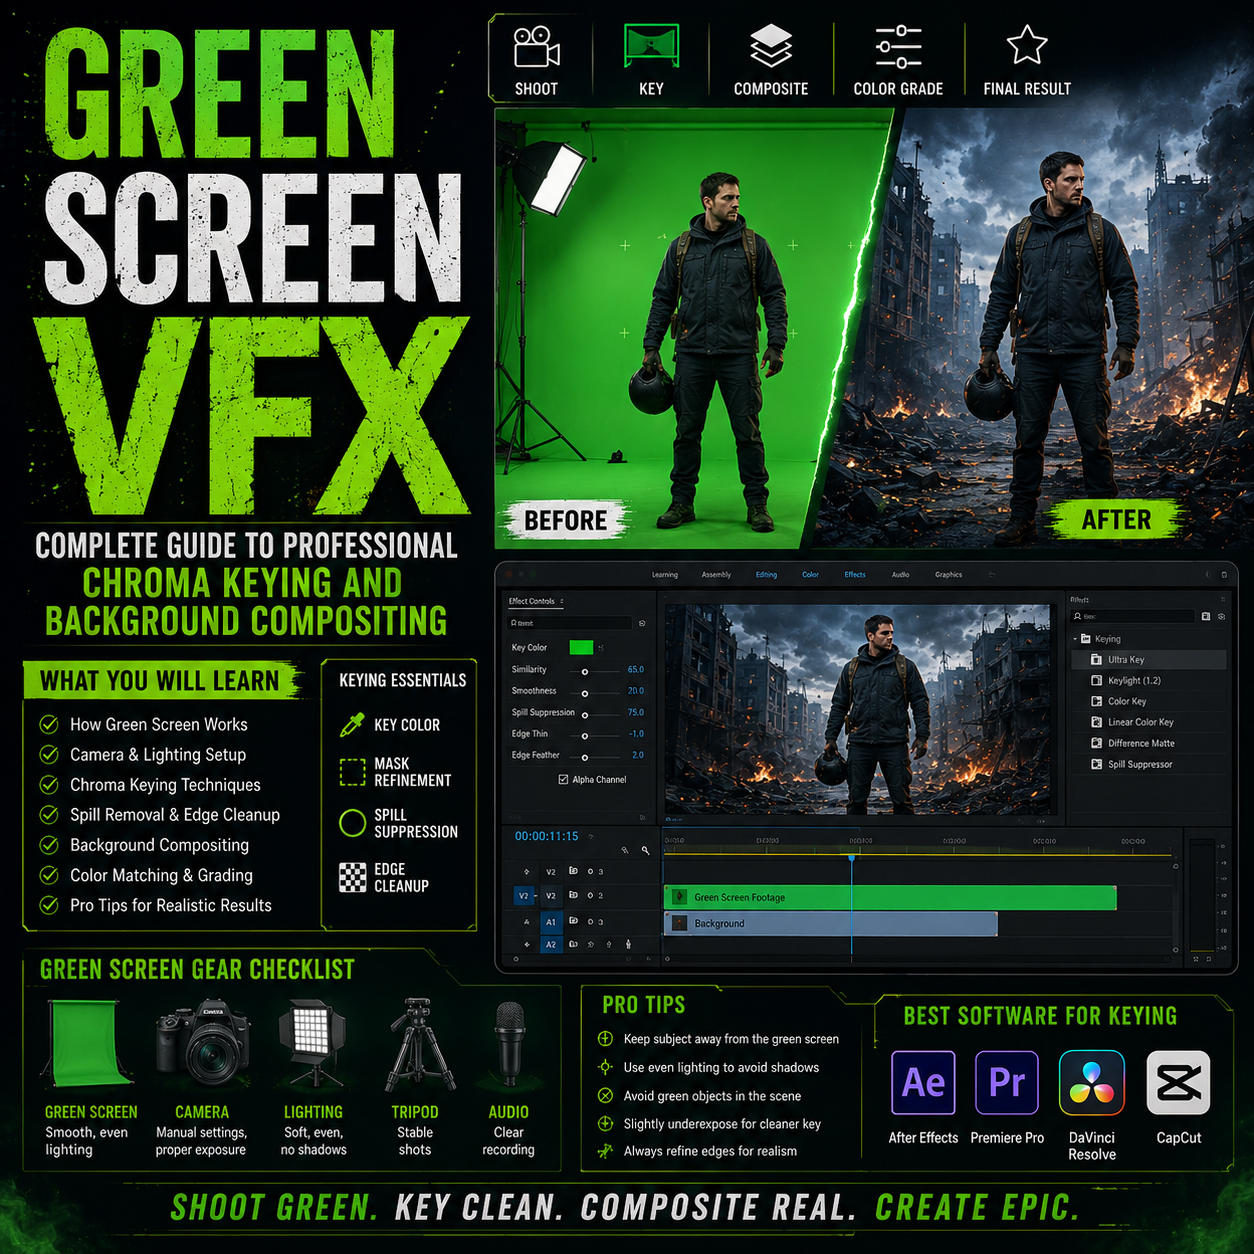
Green screen VFX is a compositing technique that separates an actor or object from the background so you can replace it with anything.
The Basic Process:
- Film on green background - Actor stands in front of bright green (or blue) fabric
- "Key" the green - Video software removes the green, leaving transparency
- Add new background - Place footage, image, or graphic behind the actor
- Composite and refine - Adjust lighting, shadows, and edge details
- Result - Actor appears to be in a completely different location
Why Green?
Green is used because:
- Human skin tones contain no green, so it doesn't key out skin
- Green cameras are more sensitive to green wavelengths
- Fabric dye technology produces bright, consistent green
- Contrast between actor and background is maximum
(Blue is used similarly in some cases, though less common.)
Green Screen vs. Blue Screen
Green Screen:
- Industry standard
- Better for most live-action work
- Actor skin tones distinct from green
- Most lighting setups work well
Blue Screen:
- Better for actors with red/blonde hair
- Older technology (less common now)
- Requires more precise lighting
- Some professionals prefer for certain scenarios
Verdict: Use green screen 95% of the time.
How Green Screen VFX Works in Practice
Let's break down the actual technical process, because understanding this prevents expensive mistakes.
Step 1: Filming on Green Screen
You're shooting an actor who needs to be composited into a fantasy landscape.
Requirements:
- Green fabric backdrop (seamless paper or cloth)
- Consistent, bright lighting on the green
- The actor positioned at proper distance from the green (3-6 feet is standard)
- Camera white balance set correctly
- 4K resolution preferred (more data to work with)
Key principle: The quality of your green screen footage determines the quality of your final composite. No amount of VFX wizardry can fix poorly lit green screen.
Step 2: Keying (Removing the Green)
Once you have your footage, you use video editing software to remove the green.
In Premiere Pro:
- Effects panel → Keying → Ultra Key
- Select the green color
- Adjust spill suppression (green reflections on actor)
- Fine-tune matte (transparency edge)
In After Effects:
- Effects → Keying → Keylight
- Select the green color
- Screen matte to see what's being removed
- Adjust parameters until clean key
In DaVinci Resolve:
- Fusion page → Add a Key node
- Select green color range
- Refine edges with Core Matte and Matte Finesse
In CapCut:
- Effects → Chroma Key (green screen)
- Adjust color range and edge softness
- Done (CapCut is simpler but less precise)
The Goal: Create a perfectly transparent area where green was, while keeping every pixel of the actor sharp and complete.
Now you have an actor floating on transparency. You add what goes behind them.
Options:
- Still image background - Photo or graphic
- Video background - Footage or motion graphics
- Green screen VFX background - Pre-made compositing backgrounds
- 3D environment - Rendered from Blender or game engine
Step 4: Compositing and Refinement
The keying was perfect, the background is great, but the composite still might look fake. This is where the art happens.
Issues to address:
Lighting mismatch:
- Actor shot in studio lighting
- Background is moonlit forest
- Color correction needed so actor's face brightness matches environment
- Apply curves, levels, color grading to actor to match background
Shadow and reflection problems:
- Where is the light coming from in the background?
- Actor should have a shadow on the ground
- Add drop shadow or create artificial shadow
- Adjust angle to match light direction
Edge artifacts:
- Green spill (green glow around actor's edges)
- Unnatural edge due to compression or bad keying
- Use spill suppression tools
- Paint out remaining artifacts
- Feather edges slightly for smoothness
Motion and perspective:
- Is the actor moving at realistic speed?
- Does the perspective match (actor appears right distance from background)?
- Adjust scale if actor looks too big/small
- Add camera tracking if background is supposed to move with camera
Result: A seamless composite where the actor appears genuinely present in the background environment.
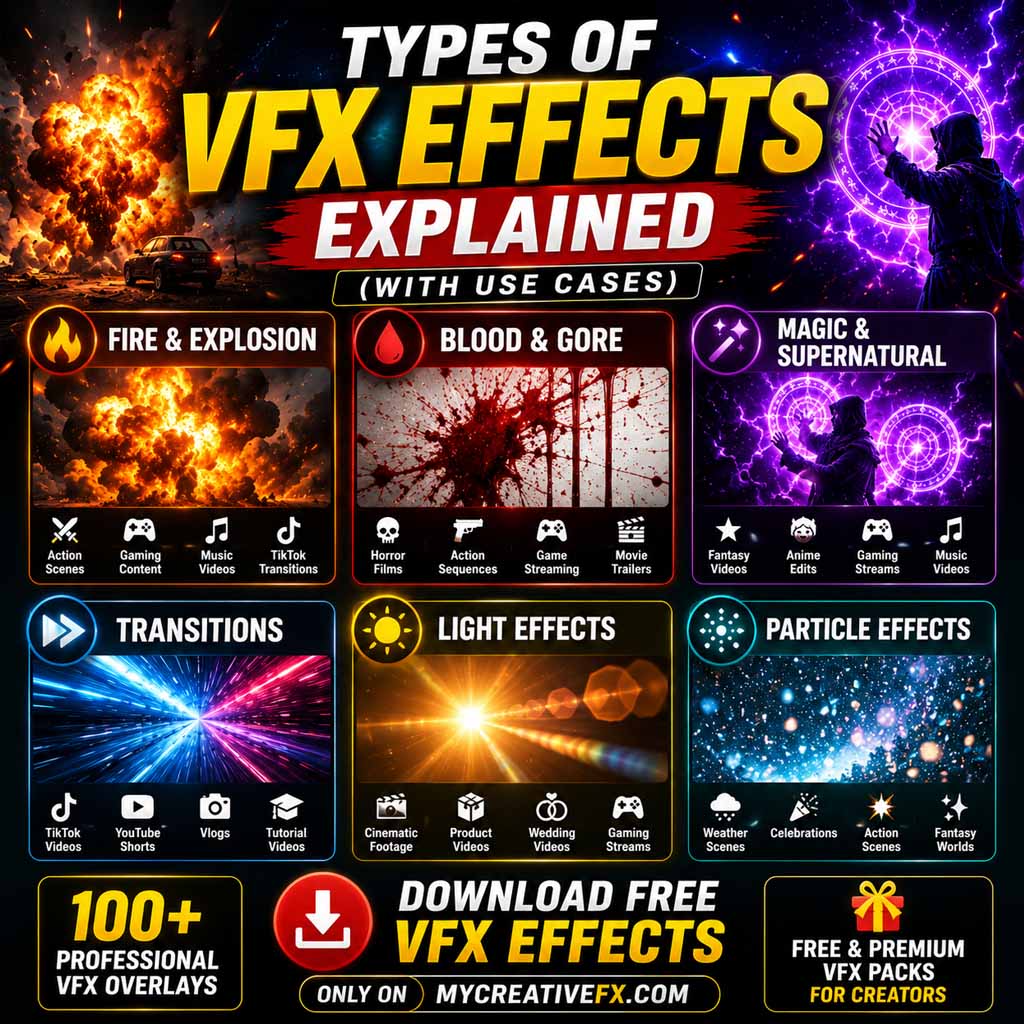
Types of Green Screen VFX Backgrounds
Not all green screen VFX backgrounds are created equal. Understanding the categories helps you choose correctly.
1. Photorealistic Backgrounds
What they are: Real filmed footage of locations Best for: Professional, broadcast-quality work Lighting consideration: Must match the background's natural lighting Cost: $20-100 per background (or subscription) Software: Works with any video editor Example use cases: Interview on city street, actor in office, person outdoors
Sources:
2. Abstract/Artistic Backgrounds
What they are: Animated patterns, particles, light effects Best for: Creative projects, music videos, stylized content Advantage: Lighting doesn't need to match (abstract so authenticity isn't required) Cost: $5-30 per background Example use cases: Music video performer, creative title backgrounds, concert performance
Common styles:
- Neon/cyberpunk effects
- Particle animations
- Light leaks and lens flares
- Geometric patterns
- Color gradients
3. Virtual Studio Backgrounds
What they are: 3D rendered environments or motion graphics Best for: Talk shows, interviews, corporate videos Advantage: Professional appearance, fully controllable Tools: Often require After Effects or Blender knowledge Cost: $10-50 Example use cases: Virtual interview set, corporate presentation, news broadcast
4. Dynamic/Interactive Backgrounds
What they are: Backgrounds with movement or effect integration Best for: Game streaming, performance, dynamic content Challenge: More processing power required Software: Works with most editors, may be slow on older systems Example use cases: Streamer with animated background, performer with moving scenery
Green Screen VFX Techniques: Professional Approaches
Technique 1: The Perfect Key
Most common approach. Single person/object, clean keying, professional appearance.
Process:
- Film on green screen with perfect lighting
- Key using Keylight or Ultra Key
- Adjust spill suppression until no green halos
- Add background VFX
- Color grade actor to match background
- Export
Best for: Interviews, product demos, educational content, commercials
Challenges: Green spill, motion blur, hair detail
Solution: Spend time on lighting and keying. 80% of composite quality comes from these steps.
Technique 2: Rotoscoping (Advanced)
For complex situations where automatic keying fails (transparent materials, detailed hair, etc.).
Process:
- Frame-by-frame manual masking of the actor
- Auto-keying for body, manual refinement for edges
- Blend with background
- Time-consuming but results are flawless
Best for: Actors with long, flowing hair; transparent clothing; complex subjects
Time investment: 1-2 minutes per second of footage (can be 10+ hours for short scene)
Cost: Professional rotoscoping costs $1,000-5,000 per minute of footage
DIY: Possible with After Effects, but requires patience and practice
Technique 3: Luma Key (Brightness-Based)
Less common but useful in specific situations.
How it works:
- Uses brightness instead of color to create the key
- Good for backlit subjects or when color key fails
When to use:
- Actor backlit against green
- Green is inconsistently lit
- Complex lighting situations
Challenge: More difficult to refine than chroma key
Best software: DaVinci Resolve's Matte tool handles this well
Technique 4: Depth-Based Keying
Advanced technique using depth information (3D Cameras, RGBD sensors).
How it works:
- 3D camera captures distance information
- Software separates foreground (actor) from background (green) using depth, not color
- Results are extremely precise
Cost: 3D cameras expensive ($5,000+), software subscription required
Best for: High-end productions, VFX houses
DIY: Not practical for most creators
Professional Green Screen VFX Compositing Workflow
Here's how professionals do it:
Pre-Production Planning
Before you film:
- Define the final background
- Determine lighting direction (so actor lighting can match)
- Plan camera movement (green screen, camera track, or both?)
- Scout location if using real-world background footage
On Set
During filming:
- Set up green screen (wrinkle-free, consistent distance)
- Light the green evenly (no hot spots, no dark spots)
- Light the actor separately (match background's lighting direction)
- White balance correctly
- Test footage in post software immediately (catch problems before wrap)
- Shoot multiple takes with slight angle/position variations
Post-Production: Editing
Day 1 - Keying:
- Import footage
- Apply key effect
- Adjust parameters for clean key
- Mark problem frames
- Save project
Day 2 - Background selection and placement:
- Browse green screen backgrounds
- Download 3-5 that work
- Layer under actor footage
- Scale/position to frame actor correctly
- Note which looks best
Day 3 - Color correction:
- Add color grading to actor footage
- Match actor's skin tone and brightness to background
- Adjust shadows and highlights
- Test on multiple monitors
- Fine-tune
Day 4 - Refinement:
- Address any artifacts (green spill, edge halos)
- Add drop shadows if needed
- Add subtle motion to background if static
- Final review
Day 5 - Export:
- Final color check
- Export high quality
- Review exported file
- Deliver
Professional Software Stack
Budget Option:
Mid-Range:
- Adobe Premiere Pro ($54.99/month)
- After Effects ($54.99/month) for complex keying
- Stock footage library ($20-100 per background)
- Total: ~$110/month
Professional:
- Nuke (node-based compositing, $5,000+ annually)
- Silhouette (dedicated rotoscoping, $1,000)
- Professional camera ($20,000+)
- Total: $25,000+
Verdict: For 95% of creators, Premiere Pro + DaVinci Resolve + MyCreativeFX is sufficient.
Common Green Screen VFX Mistakes (And How to Avoid Them)
Mistake 1: Poor Green Screen Lighting
What happens: Green screen looks uneven, some areas bright, some dark. Keying becomes difficult.
Cause: Insufficient lights or poorly positioned lights
Solution:
- Use at least 2 lights specifically for the green screen
- Position lights 45 degrees to the side, aimed straight
- Ensure even brightness across the entire screen
- Check with a light meter if available (consistency is key)
- Cost: $100-500 for adequate lighting kit
Mistake 2: Actor and Green Not Separated
What happens: Actor's shadow falls on the green, creating a dark area that won't key out. Or actor's back is against the green screen (too close).
Cause: Insufficient space between actor and green screen
Solution:
- Position actor 3-6 feet from green screen
- Light actor and green separately (different light sources)
- Ensure no shadows fall on green
- Cost: Larger studio space (may mean renting space: $200-1,000 per day)
Mistake 3: Overshooting the Green
What happens: Green color is too bright/saturated, hurts to look at, and doesn't key smoothly.
Cause: Over-lighting the green screen or using overly saturated material
Solution:
- Reduce green light intensity
- Use mid-tone green fabric (not neon)
- Adjust camera exposure so green doesn't blow out
- Cost: None (just adjustment)
Mistake 4: Inconsistent Camera White Balance
What happens: Green color shifts across the footage (some frames greener than others), making consistent keying impossible.
Cause: Auto white balance on camera changed between takes, or lights shifted
Solution:
- Set white balance to custom/manual before filming
- Point camera at green screen and set white balance point
- Lock white balance for entire shoot
- Use consistent lighting (all same color temperature lights)
- Cost: None
Mistake 5: Wrong Background Color Tone
What happens: Actor keyed on cool-toned green, but background is warm. Composite looks fake because lighting doesn't match.
Cause: Not planning background before filming
Solution:
- Choose background before shooting
- Light actor to match background's direction and color temperature
- If background is golden sunset, light actor with orange/warm light
- If background is cool blue ocean, light actor with blue-shifted light
- Cost: Extra pre-production planning (free)
Mistake 6: Bad Background Choice
What happens: Actor appears to be outside a office window, but position/scale is wrong.
Cause: Didn't consider actor's position relative to background
Solution:
- Choose backgrounds that match actor height/scale
- Consider perspective (is actor close or far from the background?)
- Match camera angle of background to camera angle of actor footage
- Cost: None (just better choices)
Mistake 7: Visible Keying Artifacts
What happens: Green halos around actor's hair, rough edges, or "fringing"
Cause: Over-aggressive keying, not enough adjustment
Solution:
- Use spill suppression (removes green reflections)
- Feather edges slightly to soften
- Apply light matte refinement
- In severe cases, rotoscope the problem areas
- Cost: Time (no additional money)
Mistake 8: Forgetting Color Grade
What happens: Actor shot in studio (neutral color, bright), background is moody forest (cool, dark). Composite looks obviously fake.
Cause: Skipping the color correction step
Solution:
- Always color grade actor to match background
- Adjust brightness, saturation, and color temperature
- Add subtle shadows on actor from background environment
- Use DaVinci Resolve (free) for precision color matching
- Cost: $0-50
Download Photorealistic Backgrounds
Best for professional, believable composites.
Recommended sources:
What to look for:
- High resolution (1080p minimum, 4K preferred)
- Consistent lighting (makes color matching easier)
- Variety of angles (front view, 3/4 view, side view)
- Clearly staged (office, outdoor, street, nature)
Download Abstract/Artistic Backgrounds
Best for creative projects, music videos, performances.
Popular styles:
- Particle animations (swirling lights, floating particles)
- Neon effects (cyberpunk, vaporwave aesthetic)
- Color gradients (simple backgrounds, highly customizable)
- Light leaks (organic, organic-feeling effects)
Cost: $5-20 per background
Example use cases:
- Music video of singer on abstract background
- Podcast intro with animated effects
- Streamer with dynamic, customizable background
Download Virtual Studio Sets
Best for talks, interviews, presentations.
Common designs:
- Modern office set
- Broadcast news studio
- Minimalist corporate background
- High-tech futuristic set
Where to find:
Cost: $15-50 per set
DIY: Create Your Own Green Screen Backgrounds
If you have After Effects or Blender skills:
In After Effects:
- Create solid color background
- Add text, graphics, animations
- Use built-in effects (particles, lights, glow)
- Render as video file
- Use as green screen background
In Blender:
- Build 3D environment
- Render to video
- Use as green screen background
- Process: 4-8 hours for beginners, results are professional
Advantage: Fully customizable, no recurring costs
Disadvantage: Steep learning curve
Green Screen VFX for Different Platforms
YouTube Videos
Resolution: 1080p (4K if targeting 4K viewers) Background type: Photorealistic or professional sets Keying precision: Medium (YouTube compression hides minor artifacts) Recommendation: Download professional backgrounds, spend time on lighting and color correction
TikTok / Instagram Reels
Resolution: 1080p (vertical format) Background type: Artistic, animated, or trendy effects Keying precision: Low (mobile compression is aggressive) Recommendation: Abstract backgrounds, bold effects, quick cuts hide imperfections
Streaming (Twitch, YouTube Live)
Resolution: 1080p or 720p (depends on bitrate) Background type: Dynamic, customizable backgrounds Keying precision: High (viewers watching live will notice artifacts) Recommendation: Professional lighting, high-quality background, test thoroughly before streaming
Professional/Broadcast
Resolution: 4K (2160p) Background type: Photorealistic, perfectly color-matched Keying precision: Extreme (broadcast monitors reveal everything) Recommendation: Professional equipment, rotoscoping if necessary, multiple color grades
Green Screen VFX Tools Comparison
Free/Affordable:
- DaVinci Resolve (free desktop app) - Excellent keying, professional color tools
- HitFilm Express (free) - VFX-focused, beginner-friendly
- CapCut (free mobile app) - Quick and easy for simple green screen
Mid-Range:
- Adobe Premiere Pro ($54.99/month) - Industry standard, easy to use, comprehensive
- Filmora ($60-100/year) - User-friendly, good green screen tools
Professional:
- After Effects ($54.99/month) - Industry standard for compositing, most control
- Nuke ($5,000+/year) - VFX houses standard, highest precision
- Fusion (included in DaVinci Resolve Studio, $295) - Powerful compositing
Recommendation: Start with DaVinci Resolve (free). Upgrade to Premiere Pro if you need easier timeline editing. Move to After Effects only if you need advanced compositing.
Green Screen Lighting Equipment Guide
You don't need expensive equipment, but you do need adequate lighting.
Budget Setup ($100-300):
- 2x softbox lights with stands: $60
- 1x green screen backdrop with stand: $40
- Total: $100
Mid-Range Setup ($500-1,000):
- LED panel lights (more color accurate): $300
- Professional green screen material: $150
- C-stands and arms: $200
- Total: $650
Professional Setup ($2,000-5,000):
- Profoto or Arri lights: $1,500-3,000
- Premium green screen material: $300-500
- Complete stand system: $500+
- Total: $2,300+
Verdict: Don't overspend initially. Adequate lighting matters more than expensive equipment.
Troubleshooting Green Screen VFX Problems
Issue: Can't get clean key no matter what settings
Causes:
- Green screen is not evenly lit
- Green screen is wrong color (too bright, too dull)
- Camera white balance is off
Solutions:
- Check green screen lighting (very bright? any shadows?)
- Adjust camera white balance to match green
- Try different keying algorithm (Ultra Key vs. Keylight vs. Core Matte)
- If all else fails: rotoscope manually
Issue: Green spill is visible around actor's edges
Causes:
- Actor is too close to green
- Green light is too bright
- Actor has reflective clothing
Solutions:
- Adjust spill suppression tool in keying effect
- Reduce green light intensity
- Use feathering to soften edges
- Paint out remaining spill manually
Issue: Composite looks unnaturally bright
Cause: Actor lit too bright, doesn't match background
Solution:
- Reduce actor's exposure with curves tool
- Add subtle shadows from background environment
- Color match using color picker (sample background's color onto actor)
Issue: Actor looks like they're floating (no sense of ground contact)
Cause: No shadow or grounding element
Solution:
- Add drop shadow under actor
- Adjust shadow position to match background lighting
- Blur shadow slightly for realism
- Reduce shadow opacity to 30-40%
Advanced: Depth of Field and Motion Parallax
Professional composites include depth effects.
Depth of Field
Real cameras have limited focus depth. Backgrounds appear slightly blurred.
How to create:
- Use blur effect on background
- Adjust amount to match original camera lens
- Creates sense of camera focus on actor
- Makes composite feel more realistic
Motion Parallax
Moving backgrounds create depth perception (foreground moves faster than background).
How to create:
- Track camera movement in original footage
- Match that movement in background
- Layer effects on background to enhance depth
- Requires advanced skills (camera tracking)
When to use: Cinema-quality production, professional work
Conclusion: Green Screen VFX Best Practices
- Plan before filming - Choose background, determine lighting direction
- Light properly - Green screen lighting is 50% of success
- Set camera white balance - Lock it for consistency
- Space actor and green - 3-6 feet minimum separation
- Film in high resolution - More data = better results
- Choose quality backgrounds - MyCreativeFX backgrounds are curated and tested
- Key carefully - Spend time refining the matte
- Color grade extensively - Match actor to background perfectly
- Check on multiple monitors - Viewing on accurate displays is critical
- Test before delivery - Review on the actual display it will be shown on
Green screen VFX is not magic—it's technique, planning, and attention to detail.
Master these fundamentals and your composites will look professional. Cut corners and the result looks amateur.
Start downloading green screen backgrounds today and practice. Each composite you create will teach you something about keying, color matching, or composition.
Your next cinematic composite is waiting.

 Premium Plans